


As the cool autumn breeze sets in and the moon casts its eerie light, the season of Halloween and creativity is upon us. It’s that magical time of the year when the ordinary transforms into the extraordinary and spooky. What better way to embrace the Halloween spirit than through captivating and imaginative makeup? Whether you’re preparing for an elegant Halloween party or getting ready for a night of trick-or-treating, your face becomes the canvas for creating another world.
This Halloween, the canvas is yours, and the possibilities are endless. So, grab your brushes, paints, and palettes, and let’s embark on a journey of enchantment as we explore a multitude of Halloween makeup ideas to make this spooky season truly extraordinary. Are you ready to step into the realm of Halloween makeup magic? Let the transformation begin!
Creative and Spooky Halloween Makeup Ideas
Avatar Makeup for Halloween
Achieving a Halloween makeup look inspired by the movie Avatar can be a creative and unique approach to your costume. The film’s vivid hues and distinctive designs can be transformed into a striking and alluring appearance. To help you, here’s a detailed guide with step-by-step instructions to help you achieve an impeccable Avatar-inspired makeup look.

Materials that you need:
- Blue face paint or body paint
- White face paint or body paint
- Black eyeliner or face paint
- Bright yellow or gold eyeshadow
- Shimmery silver or white eyeshadow
- Makeup brushes and sponges
- False eyelashes (optional)
- Avatar-inspired costumes and accessories
Step-by-Step Guide:
- Start your Halloween makeup with a clean, moisturized face to ensure smooth application.
- Apply Blue Base: Use a makeup sponge or brush to apply blue face paint or body paint evenly across your face and neck. Ensure complete coverage for a seamless look.
- Highlight with White: Use white face paint to highlight specific areas such as the bridge of your nose, cheekbones, and forehead. Blend well to create a subtle contrast.
- Create Facial Patterns: Carefully draw intricate patterns inspired by the Na’vi characters in Avatar with black eyeliner or face paint. Focus on the forehead, cheeks, and chin.
- Apply bright yellow or gold eyeshadow on your eyelids, blending it towards the outer corners.
- Add a touch of shimmery silver or white eyeshadow on the inner corners of your eyes and under your brow bone to highlight.
- Use black eyeliner to define your eyes with a bold line. You can also create a winged eyeliner look for added drama.
- Darken and define your eyebrows with black eyeliner.
- Lashes (Optional): Apply false eyelashes for a more dramatic and ethereal look. Choose lashes with a fluttery, feathery style.
- Set your makeup with a translucent setting powder to ensure longevity.

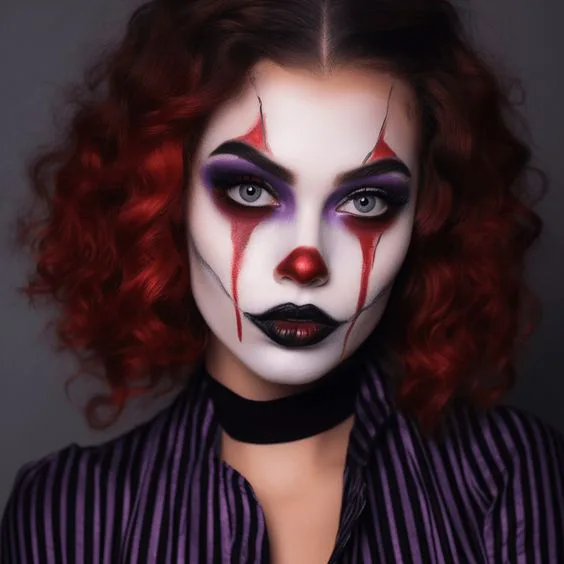
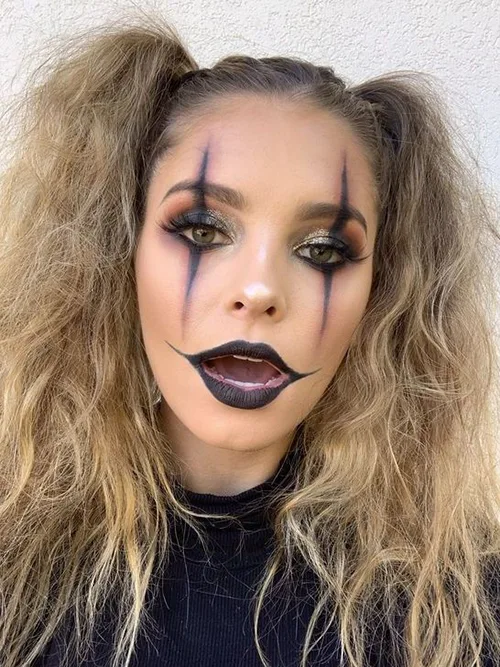
Clown Makeup Looks for Halloween

Materials:
- White face paint
- Black face paint or eyeliner
- Red face paint or lipstick
- Bright, bold eyeshadows in various colors
- False eyelashes
- Red or black nose (can be a clown nose or painted)
Steps:
- Apply white face paint all over your face, avoiding the eye area.
- Use black face paint or eyeliner to create exaggerated, dark eyes. Extend the eyeliner out for a dramatic effect.
- Paint your nose red or black for a classic clown look.
- Use bright, bold colors to paint exaggerated eyebrows and draw a large smile on your face.
- Add fake wounds or scars using special effects makeup or face paint.
- Paint lips with a bold color, such as red or black, and extend the corners to create a wide smile.
- Use black lines to outline the features of your face, creating a cartoon-like effect.
- Optional: Apply false eyelashes for added drama to your Halloween makeup.

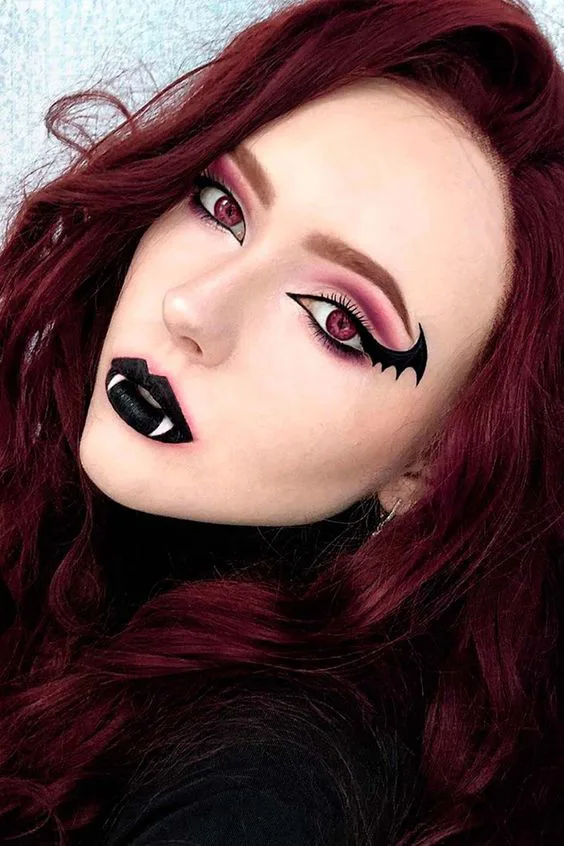
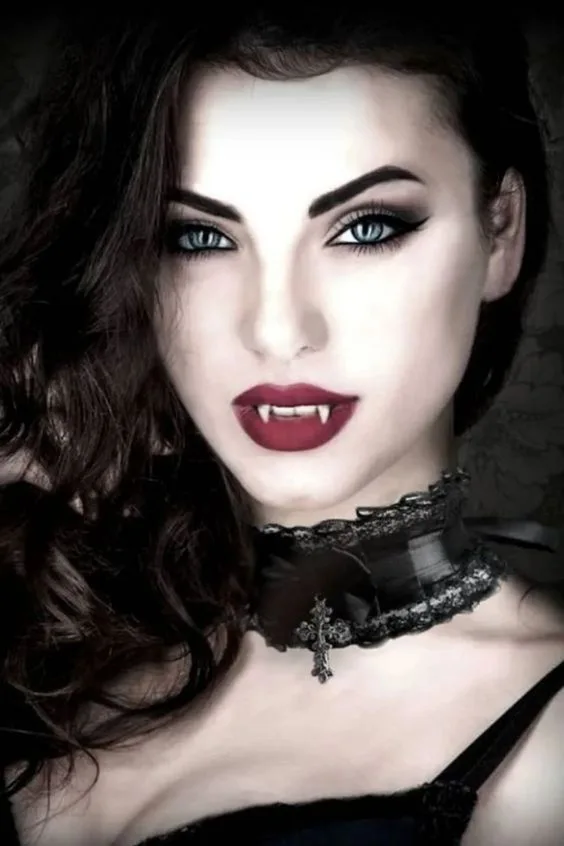
vampire look

Materials:
- Pale foundation or white face paint
- Contour palette or gray eyeshadow for a subtle contour
- Black and red eyeshadow
- Black eyeliner
- False lashes (optional)
- Red or dark lipstick
- Vampire fangs (optional)
- Makeup brushes and sponges
Step-by-Step Guide:
- Apply a pale foundation or face paint to achieve that timeless vampire complexion. Blend it evenly across your face and neck.
- Use gray contouring makeup to define your cheekbones, jawline, and the sides of your nose.
- Apply a black eyeshadow to your eyelids, focusing on the outer corners and crease for a smoky effect.
- Use black eyeliner to create a bold, winged look. Extend the eyeliner slightly beyond your natural lash line for a dramatic touch.
- If desired, add false lashes for extra intensity and a seductive gaze.
- Apply red or a mix of red and black eyeshadow around the lower lash line to create a bloodshot effect. This enhances the vampire aesthetic.
- Choose a deep red or burgundy lipstick to create vampy lips. Outline your lips with a lip liner for precision. Consider applying the lipstick slightly outside your natural lip line to give the illusion of fuller, more dramatic lips.
- If you have vampire fangs, follow the instructions to apply them.
- If you don’t have fangs, use red face paint or fake blood to create a dripping effect from the corners of your mouth. You can also use fake blood to create drips or smudges on your neck or clothing.
- Use setting powder to set your Halloween makeup and ensure it lasts throughout the night.
- Complete the look with a vampire costume, whether a classic cape, elegant attire or a more modern interpretation.
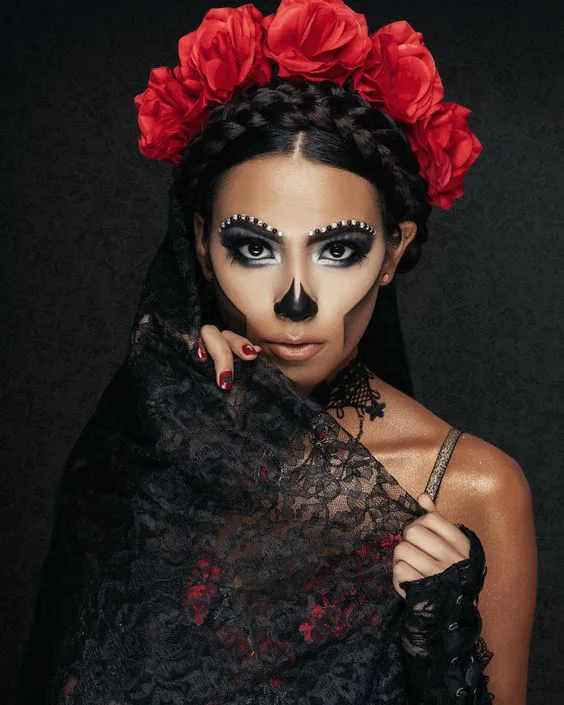
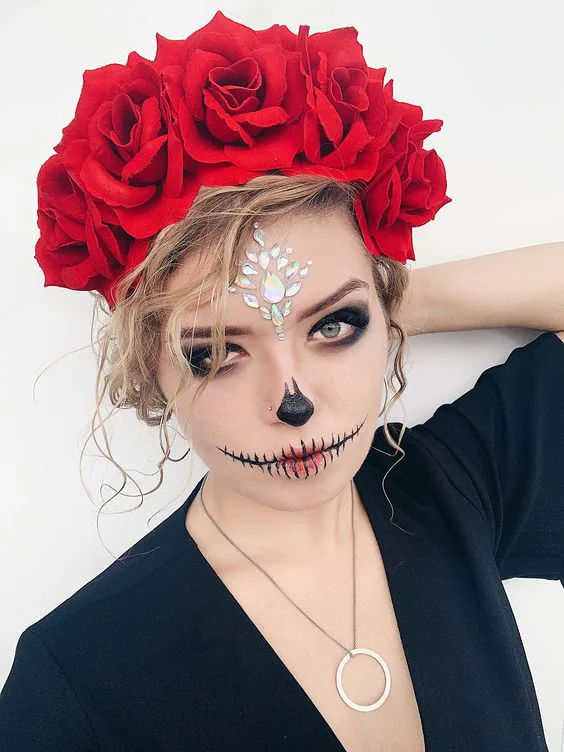
Day of the Dead Halloween Makeup
Materials:
- White face paint or white foundation
- Black eyeliner or face paint
- False eyelashes (optional)
- Rhinestones or small gems
- Brightly colored face paints (such as black, red, blue, yellow, and pink)
- Makeup brushes and sponges
- Black liquid eyeliner
- Red or black lipstick
- Setting powder
Step-by-Step Guide:
- Start your Halloween makeup by applying white face paint or foundation to create a pale base. Cover your face and neck with an even layer.
- Use black eyeliner or face paint to outline the eye sockets, creating a skull-like appearance. Extend the lines to the temples and the sides of your nose.
- Draw a triangle shape on the tip of your nose and fill it in.
- Use black face paint or eyeliner to draw hollow eyes, nose, and teeth.
Enhance the skull features by shading black or dark gray eyeshadow for depth. - Now comes the fun part! Use brightly colored face paints to add intricate designs around the skull features. Traditional Day of the Dead patterns include flowers, hearts, and swirls.
- Apply small rhinestones or gems to highlight certain areas, such as the eye sockets or along the decorative patterns.
- If desired, apply false eyelashes for a dramatic and festive touch.
- Choose a bold color for your lips, such as red or black. You can draw a line extending from the corners of your mouth for a skeletal grin.
- Set your Halloween makeup with translucent powder to ensure it stays in place.
- Add a floral headpiece or veil to complete your Day of the Dead look.

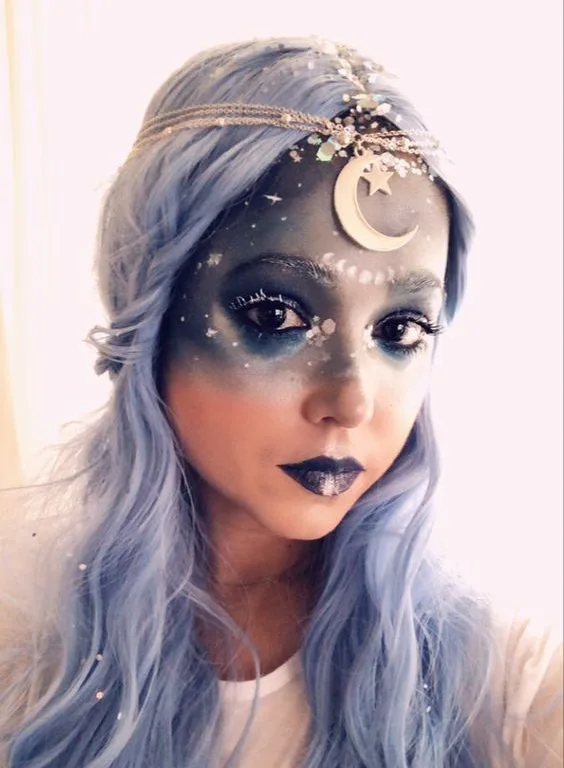
Moon Goddess makeup for Halloween
Creating a Moon Goddess makeup look for Halloween makeup is a magical and ethereal choice. Here’s a step-by-step guide to help you achieve a celestial and otherworldly appearance:
Materials:
- Pale foundation or face paint
- Shimmering eyeshadows (silver, blue, purple)
- Liquid or gel highlighter
- Metallic or glittery face paint (optional)
- White or silver eyeliner
- False eyelashes (optional)
- Dark eyeliner pencil
- Dark lipstick
- Rhinestones or small gems
- Makeup brushes and sponges
- Setting powder
Step-by-Step Guide:
- Start by applying a pale foundation or face paint to create a moonlit complexion. Ensure even coverage on your face and neck.
- Use shimmering silver, blue, and purple eyeshadows to create a celestial eye look. Apply the lighter shades on the inner corners and the darker shades on the outer corners for depth.
- Enhance the eyes with metallic or glittery face paint if you want an extra magical touch.
- Apply liquid or gel highlighter on the high points of your face, including the tops of your cheekbones, the bridge of your nose, and your cupid’s bow.
- Use white or silver eyeliner to draw crescent moon shapes on your temples or forehead. You can add stars or dots around the eyes for a celestial effect.
- Apply rhinestones or small gems along the drawn shapes to add a touch of sparkle.
- Line your eyes with a dark eyeliner pencil to define the shape. Consider creating a winged eyeliner look for added drama.
- Apply false eyelashes if you want a more whimsical and fluttery appearance.
- Choose a dark lipstick or lip stain for a mystical lip color. Deep purples, blues, or blacks can work well for this look. Add a shimmer or metallic lipstick to enhance the ethereal vibe.
- If you want extra glamour in your Halloween makeup, you can dust a subtle amount of cosmetic glitter on your cheeks and shoulders.
- Style your hair in loose waves or braids for a bohemian and goddess-like appearance.
- Consider adding celestial-inspired accessories such as a moon tiara or starry headpiece.

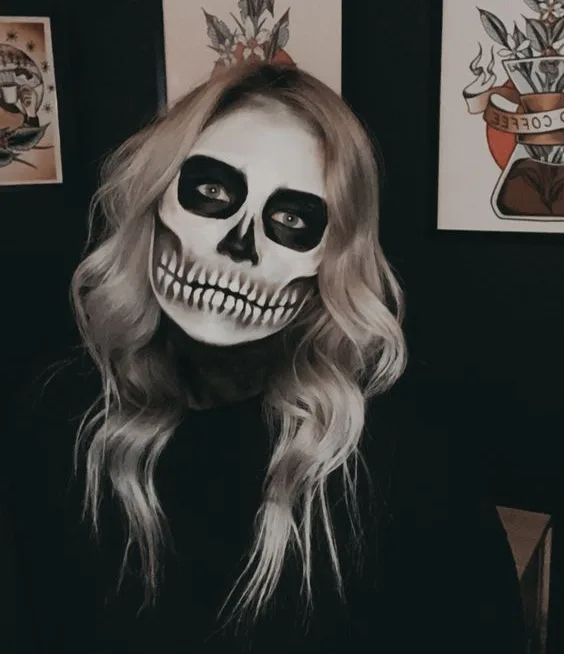
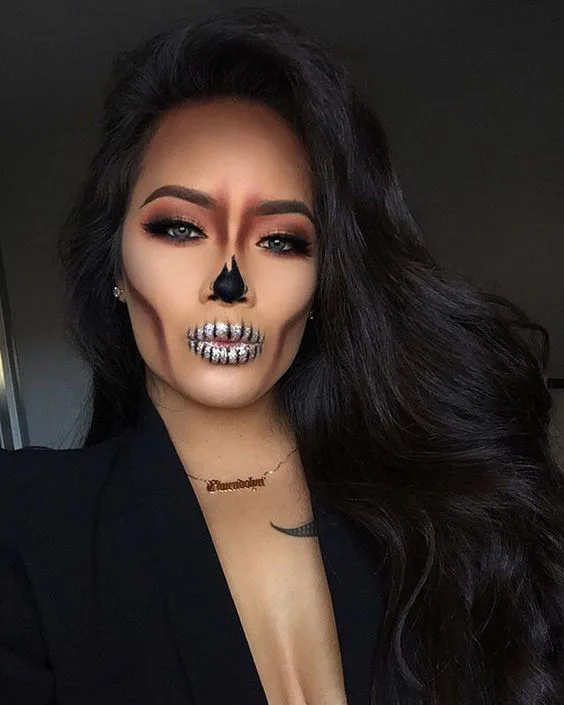
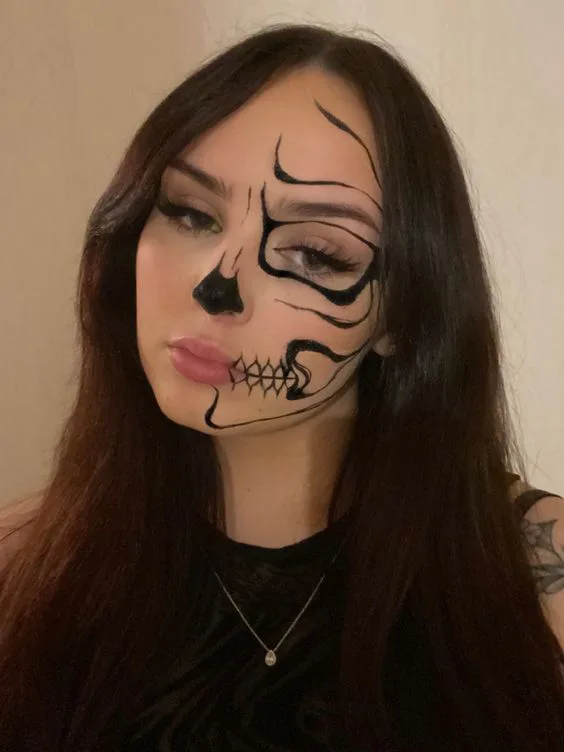
skeleton makeup
Creating a skeleton makeup look for Halloween is a classic and striking choice. Whether you want a simple and elegant skull or a more detailed and intricate design, here’s a step-by-step guide to help you achieve a spooktacular skeleton Halloween makeup look:

Materials:
- White face paint or white foundation
- Black face paint or black eyeliner
- Setting powder
- Contouring makeup (optional)
- Black eyeshadow
- Fine-tipped makeup brush
- False eyelashes (optional)
- Red or black lipstick
- Rhinestones or small gems (optional)
- Makeup brushes and sponge
Step-by-Step Guide:
- Start your Halloween makeup by applying white face paint or foundation to create a skull-like complexion. Cover your face, neck, and exposed skin evenly.
- Use black face paint or eyeliner to outline the eyes, nose, and jawline. Create hollow eye sockets, a triangle for the nose, and a curved line for the jaw.
- Fill in the eye sockets with black face paint or black eyeshadow. You can create a smoky effect by blending the black outward from the eyes.
- Darken the triangle-shaped nose with black face paint or eyeliner. Extend the lines of the jaw and add shading to create depth.
- Use the fine-tipped brush and black face paint to draw vertical lines within the mouth area to represent teeth. Add shading to create a more realistic look.
- If you want to add more depth to your skull, use contouring makeup in gray or black to shade around the hollows of the eyes, cheekbones, and jawline.
- Use the black face paint or eyeliner to draw a sinister smile. Extend the lines to create a grinning effect. You can also add small lines to represent cracks or wear.
- Apply red or black lipstick to the lips, following the natural shape of your mouth. You can create a more dramatic effect by overlining the lips slightly.
- Enhance the teeth by adding small lines or details with the fine-tipped brush and black face paint. Add shading around the jawline for additional dimension.
- Set your skeleton makeup with translucent setting powder to prevent smudging and ensure longevity.
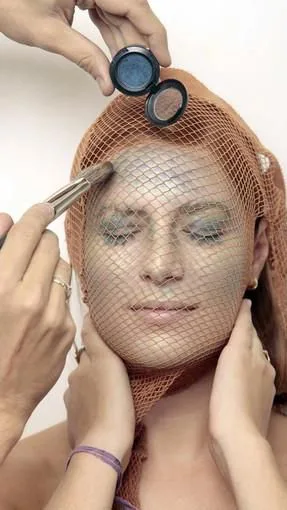
mermaid makeup Halloween
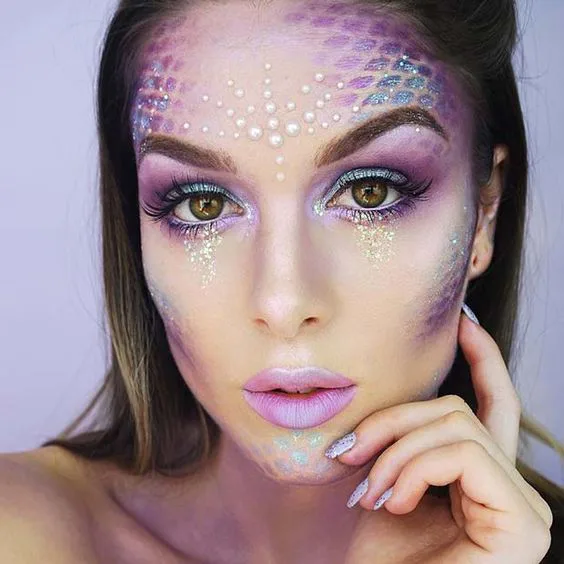
Materials:
- Blue, green, and purple face paint or eyeshadows
- Shimmering or iridescent eyeshadows
- Glitter (loose or gel)
- Rhinestones or small gems
- False eyelashes
- Liquid eyeliner
- Metallic or holographic lipstick
- Mermaid scale stencils or fishnet stockings
- Setting spray
- Makeup brushes and sponges
Step-by-Step Guide:
- Start your Halloween makeup with a base of blue, green, and purple face paint or eyeshadows. Blend the colors to create a gradient effect, focusing on the outer corners for depth.
- Apply shimmering or iridescent eyeshadows on top of the base colors to create a dazzling, aquatic look. Concentrate on the lighter shades in the inner corners of the eyes.
- Apply glitter on the eyelids and along the cheekbones for a magical, glistening effect. You can use loose glitter or a gel formula for easier application.
- Apply long, dramatic false eyelashes to enhance the eyes and give them a fluttery, underwater feel.
- Use mermaid scale stencils or fishnet stockings as a guide to draw scales on the forehead, cheeks, and neck. Apply a lighter color than the base for the scales to make them stand out.
- Add rhinestones or small gems along the scales or as a highlight on the face. You can use a clear eyelash glue to secure them in place.
- Use liquid eyeliner to draw a dramatic winged eyeliner look. Extend the lines for a fantasy touch.
- Apply a metallic or holographic lipstick to enhance the mermaid aesthetic. Choose a shade that complements the overall color scheme.
- Add sea-inspired hair accessories such as shells, starfish, or pearl-adorned hairpins.
- Set your Halloween makeup with a setting spray to stay in place throughout the night.
- You can draw scales on your shoulders or arms to complete the mermaid illusion if you feel extra creative.

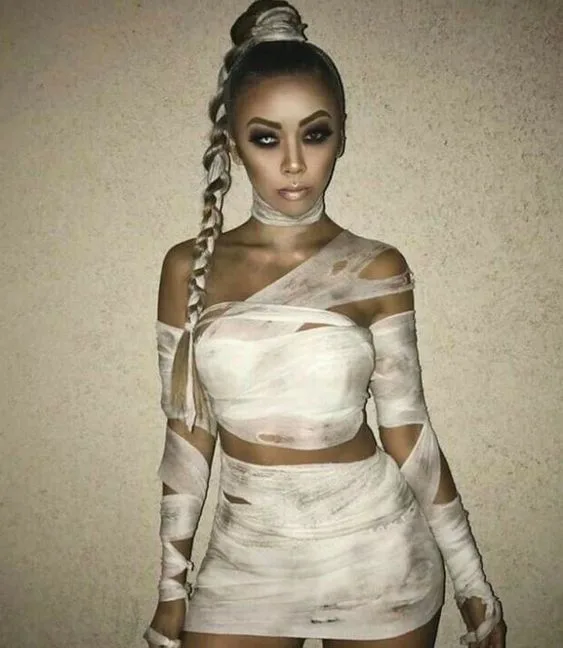
Mummy Halloween makeup
Creating a mummy makeup look for Halloween makeup allows you to transform into a spooky and wrapped-up creature. Here’s a step-by-step guide to help you achieve a mummy makeup look:

Materials:
- White face paint or foundation
- Gray or brown face paint or eyeshadow
- Black face paint or eyeliner
- setting powder
- Liquid latex or tissue paper
- Makeup sponges and brushes
- Optional: Fake blood
- Old clothes
- Optional: Contact lenses for a haunting gaze
Step-by-Step Guide:
- Start your Halloween makeup by applying white face paint or foundation to create a pale mummy complexion. Cover your face, neck, and any exposed skin.
- Use gray or brown face paint or eyeshadow to create shadows and contouring around the eyes, cheekbones, and jawline. This adds depth and a more realistic, wrapped appearance.
- Use black face paint or eyeliner to draw lines resembling the mummy’s wraps. Create crisscross patterns across your face and neck, exposing some areas for a peek at the “bandages.”
- You can use liquid latex or tissue paper for a more textured look. Apply liquid latex on specific areas and layer small torn pieces of tissue paper on top while it’s still wet. Allow it to dry before continuing.
- Shade the areas where the “bandages” meet exposed skin with gray or brown face paint to create the illusion of depth and shadow.
- Set the makeup with setting powder to prevent smudging and make the look last longer.
- If you want to add a gory touch, you can use fake blood. Apply it strategically around torn or exposed areas for a more gruesome mummy look.
- Make the mummy wraps appear aged and distressed by smudging or adding dark shadows in random spots. This gives a weathered and eerie effect.
- If you want to take your mummy look to the next level, consider wearing contact lenses with a haunting or otherworldly appearance.
- Complete the look by wrapping yourself in old clothes or costume wraps. You can strategically place the wraps to enhance the mummy illusion.
- Mess up your hair for an unkempt look, or add a headband with fabric strips to resemble more bandages.
Halloween makeup is all about expressing your creativity and embracing the spooky, the eerie, and the enchanting. You can experiment with different Halloween makeup ideas, mix and match elements, and, most importantly, have fun creating your Halloween masterpiece! Whether you want to be a mystical moon priestess or a creepy broken doll, let your imagination run wild this Halloween. So, get ready to have a blast, and Happy Halloween to you!
Related:
14 Fall Hair Care Tips for Healthy and Gorgeous Hair
How to do cat eyeliner for beginners step by step
20 trendiest brown hair colors for an attractive look
15 Most Beautiful DIY Fall Decoration Ideas for a Stylish Home


