


If you’ve ever admired a flawless smokey eye and thought, “I wish I could do that,” you’re in the right place. The smokey eye is one of those timeless makeup techniques that can add depth, dimension, and a whole lot of drama to your eyes. It’s super versatile too – whether you’re heading out for a casual brunch or a glamorous evening event, a smokey eye can be your go-to look. This guide on Smokey Eye for Beginners will help you master the technique with ease.
The best part? Once you get the hang of the basics, you can totally make it your own. Experiment with different colors and intensities to match your mood and outfit. Feeling bold? Go for a deep, sultry black. Want something more playful? Try a smokey eye with vibrant purples or shimmering golds. The possibilities are endless, and that’s what makes it so much fun.
So, grab your brushes, sit back, and let’s dive into the world of smokey eye for beginners. With a bit of practice and the right tips, you’ll be rocking this look in no time. Ready to get started? Let’s do this!
Table of contents
- Why the Smokey Eye?
- Step-by-Step Guide: How to Do a Smokey Eye for Beginners?
- Step 1: Gather Your Tools
- Step 2: Prep Your Eyelids
- Step 3: Apply a Base Eyeshadow
- Step 4: Define Your Crease
- Step 5: Add Depth with a Darker Shade
- Step 6: Define Your Lower Lash Line
- Step 7: Blend, Blend, Blend
- Step 8: Highlight the Inner Corner and Brow Bone
- Step 9: Apply Eyeliner
- Step 10: Finish with Mascara
- FAQ for How to Do a Smokey Eye for Beginners?
- Conclusion
Why the Smokey Eye?
So, why the smokey eye? Well, it’s pretty much the ultimate makeup look for anyone who wants to make their eyes pop. First off, it’s incredibly versatile – you can dress it up or down depending on the occasion. Heading to a casual brunch? Go for a lighter, more subtle smokey eye. Got a hot date or a big night out? Amp it up with darker shades and extra drama.
Plus, the smokey eye suits everyone, no matter your eye shape or color. It can make small eyes appear bigger, add definition to hooded eyes, and really highlight those peepers if you’ve got lighter eyes. And let’s not forget how customizable it is. You can play with different colors – think bronze, plum, or even navy – to create a look that’s uniquely yours. In short, a smokey eye is like your makeup secret weapon: reliable, adaptable, and always stunning. So, whether you’re just starting out or looking to perfect your technique, Smokey Eye for Beginners is the perfect guide to help you master this timeless look.
Step-by-Step Guide: How to Do a Smokey Eye for Beginners?
Step 1: Gather Your Tools
Before diving into the makeup application, ensure you have all the necessary tools and products for a smokey eye for beginners. Here’s what you’ll need:
- Eye primer: This will keep your eyeshadow vibrant and in place all day (or night) long.
- Eyeshadow Palette: Grab a palette with a good mix of light, medium, and dark shades, plus a few shimmers for that extra pop.
- Eyeliner: Whether you prefer pencil, gel, or liquid, you’ll need a trusty liner to define those eyes.
- Eyeshadow Brushes: Make sure you have a flat shader brush, a blending brush, and a smudge brush. These will be your best friends for this look.
- Mascara: Go for one that adds volume and length – we want those lashes to be bold and beautiful.
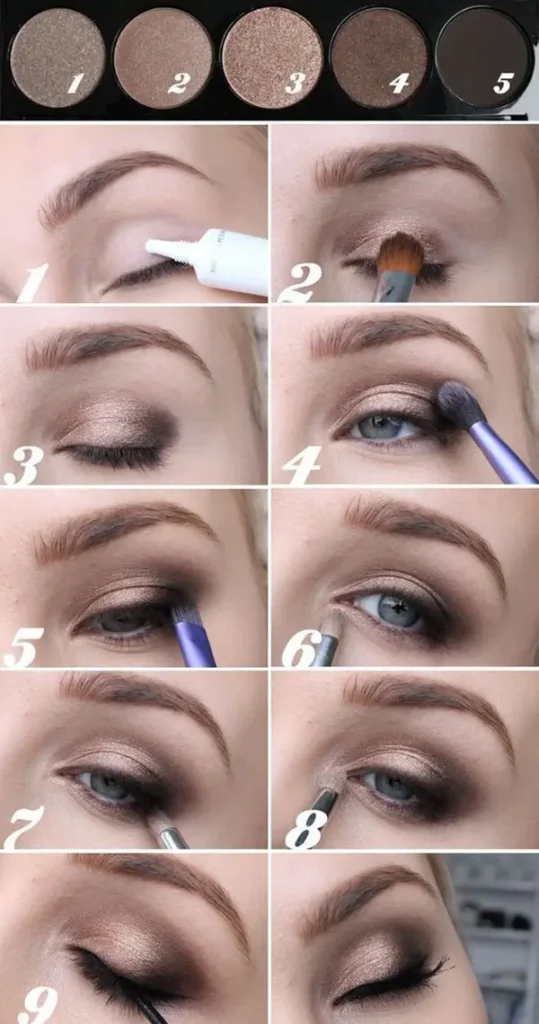
Step 2: Prep Your Eyelids
First things first, make sure your face is clean and moisturized. This is your blank canvas for the perfect Smokey Eye for Beginners. Apply an eyeshadow primer to your eyelids to ensure your eyeshadow stays put and looks vibrant all day long. If you don’t have a primer handy, no worries – a bit of concealer will do the trick. Just dab it on and blend it out.
Step 3: Apply a Base Eyeshadow
Now, grab a light, neutral shade and sweep it all over your eyelid using a flat shader brush. This base layer will help the darker colors blend more smoothly. Think of it as the foundation for your smokey eye masterpiece. Shades like beige or soft taupe work perfectly for this step.
Step 4: Define Your Crease
Next up in our Smokey Eye for Beginners guide, let’s add some depth to your eyes. Choose a medium-toned shade, like a warm brown or a soft gray, and apply it to your crease with a fluffy blending brush. Start at the outer corner of your eye and work your way inwards, using windshield wiper motions. This technique will give your eyes a lovely dimension and make them pop.
Step 5: Add Depth with a Darker Shade
Time to bring the drama! Pick a darker shade, such as charcoal or deep brown, and apply it to the outer corner of your eye. Use a small, dense brush for precision. Focus the color on the outer third of your eyelid and blend it towards the center. Remember, the key here is to keep the darkest part at the outer corner for that perfect smokey effect.
Step 6: Define Your Lower Lash Line
Don’t forget about your lower lash line – it’s essential for a cohesive Smokey Eye for Beginners look. Take a bit of your medium-toned eyeshadow and sweep it along your lower lash line with a smudge brush. Then, grab that darker shade again and concentrate it on the outer third of your lower lash line. This step will add depth and balance to your eye makeup. Make sure to blend well to avoid any harsh lines.
Step 7: Blend, Blend, Blend
Blending is the secret to a flawless smokey eye. Use your fluffy blending brush to soften the edges of the dark shadow, ensuring there are no harsh lines. This might take a bit of time, but trust me, patience is key here.
If your smokey eye looks too dark, use a clean blending brush to soften the edges and blend out some of the excess product. You can also add a bit of a lighter shade to tone down the darkness if needed.
Step 8: Highlight the Inner Corner and Brow Bone
To make your eyes really stand out, apply a light, shimmery shade to the inner corner of your eyes and along your brow bone. This will brighten your eyes and create a beautiful contrast with the darker shades, adding a touch of sparkle to your look.
Step 9: Apply Eyeliner
Now, it’s time to define your eyes even more. Line your upper lash line with your favorite eyeliner. For that classic smokey eye look, you can also line your waterline and lower lash line. Use a smudge brush to soften the line for a smokier effect. This step will make your eyes look more intense and dramatic.
Step 10: Finish with Mascara
No smokey eye is complete without mascara. Apply a generous coat to your upper and lower lashes, making sure to separate and define each lash. For extra drama, consider using false lashes – they can take your look to the next level. And there you have it, a stunning smokey eye that’s perfect for any occasion!
Tips for Perfecting Your Smokey Eye for beginners
- Start Light, Build Up: It’s easier to add more color than to remove it. Start with lighter applications and build up the intensity gradually.
- Blend with Patience: Take your time to blend each shade properly. The key to a seamless smokey eye is smooth transitions between colors.
- Use Tapes or Shields: If you’re worried about fallout or creating a sharp edge, use a piece of tape or an eyeshadow shield along the outer corner of your eye.
- Experiment with Colors: While black and gray are classic choices, don’t be afraid to experiment with other colors like navy, plum, or emerald for a unique twist.
- Practice Makes Perfect: The more you practice, the more confident you’ll become in creating a smokey eye. Don’t be discouraged if it doesn’t look perfect the first time.

Common Mistakes to Avoid
- Not Blending Enough: Harsh lines can ruin the smokey effect. Take your time to blend well.
- Using Too Much Product: A little goes a long way. Start with a small amount of product and build up as needed.
- Skipping Primer: Primer helps your eyeshadow stay put and look vibrant. Don’t skip this step.
FAQ for How to Do a Smokey Eye for Beginners?
1. What is the best eyeshadow palette for beginners attempting a smokey eye?
If you’re just starting out with smokey eyes, go for a neutral eyeshadow palette that has a good mix of mattes and shimmers. Palettes like Urban Decay Naked Basics or Maybelline The Nudes are perfect. They offer versatile shades that make it easy to create that perfect smokey look without overwhelming you with too many options.
2. Can I use different colors for a smokey eye?
Absolutely! While the classic smokey eye is all about blacks and grays, don’t be afraid to get creative. Try experimenting with browns, purples, greens, or even blues to complement your eye color and outfit. It’s a fun way to mix things up and make the look truly your own.
3. How can I prevent my eyeshadow from creasing?
Nothing ruins a smokey eye faster than creasing! To keep your eyeshadow looking fresh all day, start with an eye primer. It creates a smooth base and helps your eyeshadow stick better. For extra staying power, you can also dust your lids with a bit of translucent powder before applying your eyeshadow.
4. Is a smokey eye suitable for daytime?
Yes, you can definitely rock a smokey eye during the day! Just tone it down a bit by using lighter shades and blending a little less intensely. Opt for soft browns or taupes for a more subtle, daytime-friendly version of the look.
5. What should I do if I mess up my smokey eye?
Don’t panic if things don’t go perfectly! Keep some cotton swabs and makeup remover handy to fix any mistakes. If you’ve got harsh lines, a clean blending brush can be your best friend to smooth things out. Remember, practice makes perfect!
Conclusion
Creating a smokey eye for beginners might seem a bit intimidating at first, but don’t worry – with a bit of practice and the right tips, you’ll be nailing it in no time. The trick is to blend, blend, blend! Seriously, good blending is what makes a smokey eye look seamless and professional. Start with a little color and build it up gradually to get that perfect intensity without going overboard. Whether you want a soft, subtle look for the daytime or a dramatic, bold style for the evening, the smokey eye has got you covered.
It’s such a versatile and timeless technique that can take any makeup look to the next level. So, grab your brushes, play around with different shades, and most importantly, have fun with it! Makeup is all about expressing yourself, so don’t be afraid to experiment and find what works best for you.
Related Posts: